Designing your yearbook can be a lot of work. It can also be a lot of fun! Your yearbook page layouts provide the perfect opportunity to really harness your creative skill-set.
The real question though, is how you can design captivating yearbook page layouts? It’s one thing to have a creative, artsy layout. It’s an entirely different thing to have a yearbook layout that really captivates your audience!
We’ve put together some tips to help you design a captivating yearbook page layout.
Creating A Yearbook Page
A great yearbook is organized, well-structured, and maximizes all the space available. Your yearbook page layout is more than just the copy and visuals.
Let’s start with the basics. In order to make a yearbook page, you need to:
- Start with your yearbook’s style guide or master template
- Set the goals for your page, such as content and theme.
- Choose a yearbook page template. Alternatively, create a custom yearbook page layout. Your choice should depend on the goals for your page.
- Add your content. This will include captions, copy, photos and headlines.
- Edit your page. Get feedback from your yearbook team.
- Proof your page.
These steps can be followed for every page of your yearbook. Following this process can make creating your yearbook much easier!
How to Design Captivating Yearbook Page Layouts
Now that we’ve covered the basics, it’s time to get into the details! Designing a captivating yearbook page layout is easier than you may think. Follow these tips to make sure your yearbook is one that really captivates.
Write Effective Headlines
A headline has one primary purpose: to tell the reader what the page is about. Your headline needs to jump out at the reader. A good headline is short and descriptive. Make sure it’s readable, and in a large font that captivates your reader.
Compliment your primary headline with subheadings throughout your copy. These are a great way to break up the content. They also help to further highlight what your page is about. Your headlines can be a great way to grab your readers eye. Try using drop shadows or other effects on your headlines to really make your page pop!
Choose The Right Photo
Choosing the right photo for your yearbook page is important! Make sure the photo that you choose relates to the content of the page. Just like your headline, the right photo will jump out at your reader. It will entice them to read more.
Feel free to add additional photos or pictures to your page. Make sure they relate to the primary content and theme.
Selecting Your Font
It may not be something that you immediately think of, but fonts can help define a page. It’s also a great opportunity to get creative. You can highlight elements of your page with different fonts, or different colors.
Margins & Bleeds
As part of creating your yearbook layout, you should have an understanding of your margins and bleeds. Remember, not all of the workspace you see on your page will be printable space. You’ll want to know where the trim zone on your page is (spoiler alert – this is part of the page that’s cut off at the printers).
Your yearbook design software can be a great help here. It should highlight where on the page you can place your various design elements. Background colors and elements should span the entire page so that they bleed from one corner to the other post-trim, but other design elements should stay within a safety zone to avoid being trimmed in production.
Find Your Perfect Yearbook Design Software
The best way to create a captivating yearbook page, is to play around with different options! Using yearbook design software can give you the flexibility to try different design elements on your page. It may also offer various templates and backgrounds for you to choose from, to help you create a one-of-a-kind yearbook.
At Yearbooklife, we want to help you create a professional, memorable yearbook. That’s why we offer easy-to-use yet sophisticated design tools like Pictavo. Create a unique yearbook, keep your staff organized, and get help marketing your yearbook. Interested in learning more? Contact YearbookLife by clicking here today.
On Friday, October 17th 2014, we will be holding our annual “Yearbook Workshop.” We recommend new and long time yearbook advisers attend to get valuable tips to help make the yearbook process as stress free as possible.
The following topics will be discussed. We look forward to seeing you there.
YearbookLife Workshop Topics:
- Welcome and Introductions
- Sign Up Sheet
- Raffle
- Review Kits/Collection Envelopes
- Sales Flyers/Banners
- Receiving Our Emails
- Referral Fees
- Deposits
- Picture Resolution – 300 dpi
- Camera Settings
- Organizing Photos
- Scanning
- Supplements
- PSPA CD
- Deadlines
- Custom Cover
- What is a custom cover
- Proofs vs. No Proofs
- Corrections on Proofs
- Resubmissions
- Delivery
- Yearbook Enhancements
- Help and Support
- Tech Support
- WebEx
- Pictavo Help
- Customer Service
- Yearbook Kit
- Personal Visits
- Office Visits
- What’s New in Pictavo
- Pictavo BuyTheYearbook
- Money Distribution
- Pictavo is not a storage service
- Admins. and Multiple Admins
- Photo Upload Problems
- Submitting Your Book
- Questions
If you would like to learn more, please contact us toll-free at 888-680-0143.
BLEEDS
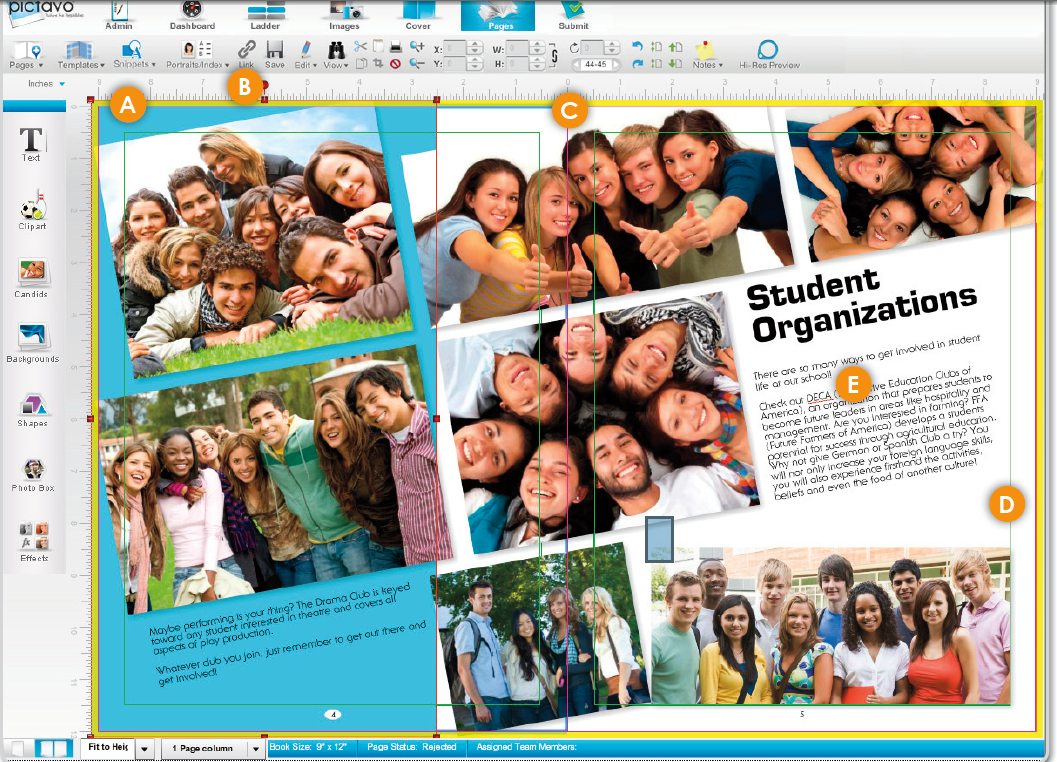
• The yellow border around the page in Pictavo is the bleed area. All color blocks and candids that are intended to extend off the page (or bleed) should completely extend to the outer edge of the yellow area. This will eliminate slivers of white at the edges of your pages when the page is trimmed.
• Pictavo backgrounds (and any custom backgrounds that you import into the Backgrounds folder) will automatically fill the bleed area completely.
(SEE A BELOW)
The candids and blue shape are properly extended to the outer edge of the yellow bleed area. There will be no white area on the page edges, because the image is set to bleed correctly.
TWO-PAGE SPREADS
• With a hard cover binding and two-page spreads, Smyth binding is recommended instead of a Standard Hard Cover binding. Standard Hard Cover bound books may lose up to 1/2” of the images and text that are placed across the gutter.
• Click on the Link tool (B) to link two pages together if you are designing two-page spreads in your book. Two-page spreads allow you to place images and/or text across the center, or gutter, of your book.
(SEE C BELOW)
This image crosses over the gutter of the book. If a Standard Hard Cover binding is used, portions of the students’ faces will be pulled into the binding and will not be visible to the reader.
SAFETY MARGINS
• The thin green margin lines around the edges of each page are safety margins. They are set 3/8” inside the trim edge. Keep important images and text inside these guides to prevent them from being trimmed off or lost in the gutter/binding.
• For items that are meant to extend off the page, it’s acceptable to place them outside the safety margins (see Bleeds above).
• If you are doing a hard cover book and have text or images that are less than 1/4” from the trim line on the spine side of the book, Smyth binding is recommended to prevent them from being lost in the binding.
(SEE D BELOW)
The image in the lower right is kept within the safety margins and there is no risk of it being
trimmed off.
Spell Check
• A red jagged line will automatically appear beneath any word not in the Pictavo dictionary.
• Right-click on the flagged word and a list of suggested alternatives will appear. You can also add the flagged word to the Pictavo dictionary if it is indeed correct.
See Spell Check in the Example shown (SEE E BELOW)
Do we need to know a lot about computers to use InDesign or our own graphics program?
You should be familiar with your hard drive, the programs you are using, and how and where to save images.
What programs may we use to create our yearbook?
QuarkXPress® (version 7 or higher), InDesign® (CS3 or higher) or Photoshop®. Knowledge of Photoshop is required if you plan to scan or resize images. Other programs may be used to create PDF files but we support only the programs listed above. If you are using another program to create your files, please contact our graphics department with questions and to submit a test. E-mail service@yearbooklife.com.
How do we begin?
Start by reading the entire PDF Instruction section in this book. Quark users should set all of the preferences as instructed on page 7 of this guide, and use one of the program templates included on your PDF Creation CD (located on the inside front cover of this guide). InDesign users should install the document preset (instructions on page 6). Load and activate color profiles and PDF export settings for both programs; follow instructions for your program, located on pages 10–21.
May we design our yearbook in a facing pages layout?
Yes. Make sure the bleeds are extended on all four sides. Convert your book to PDF files as single pages, and e-mail a PDF test to us before submitting the files for publishing. For more information contact service@yearbooklife.com.
May we include a two-page class picture spread in our book? How do we submit it?
Yes, a two-page class picture spread can be printed in your yearbook. Set it up like any other page in your book that bleeds, making sure the images meet correctly in the center of the two pages.
How should we save our yearbook document?
A PDF book may be submitted in whatever section sizes you would like (1 page, 4 page, 16 page, entire book). PDF files should be named in a manner that clearly indicates the job number and page number; e.g., jobnumber_001-016.pdf.
How do we create a pdf of our yearbook?
Install the PDF export options from the PDF Creation CD included in this guide. Follow PDF Creation Guide instructions that pertain to the programs that you are using to create your yearbook.
Is support available if we encounter problems or have questions?
Yes, phone and e-mail support is available. We will gladly help you with questions regarding our preferences, requirements, artwork, templates and image quality. Contact service@yearbooklife.com. However, we offer limited computer support and are not staffed to instruct first-time program users. For questions about computer programs, it’s best to seek help on the Internet or in your program’s user guide.
YearbookLife proudly introduced a new help center to aid our customers in their yearbook production process. This help center offers slide shows with helpful information to answer many commonly asked questions. In addition to our Yearbook Help Center, we also have a great YearbookLife YouTube Channel with tons of helpful videos including video tutorials for the top yearbook design software as well as other short videos with yearbook design tips that could help any yearbook staff!
YearbookLife’s YouTube Channel posts great informational vlogs to help you in a more visual step by step manor. These videos are created to show you exactly how to go about being successful at many different important parts of the yearbook design process. Through both showing you the actions on our computer screen and talking you through every step, the yearbook design process is made simple and very useful. Some of the videos on our channel currently include the importance of image resolution, how to scan images onto your computer, minimum computer requirements for our free yearbook software, Pictav, EZBook, and many more! These videos can be shown to your yearbook staff or yearbook administers as a great supplement to meetings or mini workshops.
At YearbookLife, we would love to hear your feedback on our uploaded videos. If there are specific topics you would like to see or believe would be helpful, contact us, we would be more than happy to help. Make sure you subscribe to our channel for free educational videos on important yearbook design process and publication topics. So what are you waiting for, subscribe to YearbookLife now!