YearbookLife wants to ensure that your yearbook is produced error-free. Therefore, we issue PDF proofs so you can review your book one more time before it moves into the production process.
Corrections to your book will be made based upon the following pricing schedule:
1. Individual text corrections such as spelling mistakes, typos, word changes, etc., completed at $9 per correction.
2. Image corrections such as moving or replacing individual images completed at $15 per image.
3. Reflowing of Portraits completed at $35 per page.
4. Color correction or Graphics work such as bleeds, resizing of images, etc., completed at $125 per hour.
*Other charges may apply. You will be notified ahead of time if additional costs are required to correct your book.
NOTE: As indicated on page 2 of your contract, “YBL reserves the right to correct any errors up to $75 without prior approval.”
Resubmission Option
Book Resubmissions – $150. Use this option if you find mulitple errors in your book and want to correct those errors yourself. This option may delay delivery of your book.
Yearbook season is in full swing! Before you know it, your yearbook will be complete and you’ll be ready for submission.
Just some information to get you through to the end…
 Final Deadlines
If you need to work past the submission date on your agreement or on the Pictavo clock, you can, just contact us to reschedule the submission and delivery dates.
Deposits & Final Payment
A 50% deposit is due upon submission of your book. We will send you an invoice for this deposit once your book is submitted. Remember that you can alter the number of books or the number of pages of your book from the original contracted amount up until your submission date without penalty. Just contact us for the adjusted price of your books.
Follow Us on Facebook!
Technical Support
To better serve you throughout yearbook season, our Technical Support Team will be working Saturdays from 11:00 a.m. to 3:00 p.m ET and extended weekday hours from 8:00 a.m. to 8:00 p.m. ET. Our technicians are available to assist you with all of your Pictavo questions. Please contact them at 1-800-887-0414, or through email at support@pictavo.com. Be sure to also refer to Pictavo’s Help Menu for detailed information about all of Pictavo’s functions.
So you’re in full design and layout mode with your yearbook. You’ve got yourself all organized… you have candid images getting uploaded, you have your student portraits uploaded, and your page ladder is organized. Except… it turns out that your school added another class to a grade, or you have so many more candid images than you were expecting and you want to include more collage pages… or you just hate the way that THIS page looks next to THAT page. So now what?
Fear not! Pictavo allows you to move pages with a simple click and drag feature. If needed, you can even add or delete pages from your book (just remember that the contract price of your book will change if you do so).
MOVING PAGES: Don’t even think about redesigning a page just to get the art off of one page and onto another. Moving a page or group of pages is a simple click and drag feature in Pictavo through the Ladder View. Simply click and hold on the page you want to move until it is framed in blue and then drag it to its new location. If you want to move more than one page, click on the first page, then Shift click on the last page until all of the pages you want moved are highlighted. Then simply move them all to the new position.
After moving the pages, Pictavo will automatically auto correct the page number. All User permissions and assignments move with the pages as well.
One thing to be aware of: If you have any linked pages, you may not be able to move the pages around as easily. Unlink all of your linked pages that maybe affected by this move.
ADDING or DELETING PAGES: Adding or deleting pages is as simple as a couple of clicks in Pictavo. From the Pages Icon, click on the Pages drop down menu in the secondary tool bar. Then click on the green “+”sign or the red delete sign to add or delete pages. A dialog box then appears allowing you to confirm where you want to add pages or which ones you want to delete.
 The Pictavo Help menu has step-by-step procedures on how to Move pages, Add or Delete pages. Click on the Help Menu button on the upper right hand corner of any Pictavo page, then select “How to” and “Pages” to find these instructions. Or give our Tech Support Team a call at 1-800-887-0414 for assistance.
Your yearbook cover can set the tone of your entire yearbook. It establishes the theme and invites people to see what’s inside.
So let’s make sure that all of your hard work doesn’t get trimmed away and that all of the components of your cover – front, back, spine, and wrap – are as perfect as possible.
What you should first identify is the “safe zone” on your cover template. Just like your Pictavo pages, a Pictavo cover has a “safe zone” on both the front and back of your cover. This “safe zone” is within the green line frame. Keep all significant design elements that you don’t want to run the risk of being trimmed off within that zone (the full name of your school, or one half of someone’s face, for example).
The yellow border that outlines the green frame is the trim or wrap area. Any artwork contained in that area may be trimmed off of your soft cover, or wrapped around the inside of your hard cover.
If you’re producing a hard cover or soft perfect bound book, you may also be able to add “spine” text. The spine of a book is the edge of the cover that you see when your book is displayed on a bookshelf. The text on a yearbook’s spine usually contains the name of the school and the year.
The “safe zone” for spine text is contained between the two pink horizontal lines in the center of your cover template.
To add spine text to your book, you have to first create a text box somewhere on the cover and enter the one line of text that you would like include on the spine. To place the text box on the spine, first “spin” the text box clockwise. Then place that text box between the two pink lines in the center of your cover template. Adjust the font style, size, and text box location to your liking at this point. Be sure to keep your text within the green lines at the top and bottom of the spine text safe zone.
Traditionally, spine text runs top to bottom, facing the back. That is why you spin the text box clockwise. If you prefer to have your text run the opposite way, spin the text box counter clockwise. Of course, the design style is your choice.
Keeping all of your significant work within the safe zones as indicated above will assure that all of the art work that absolutely must appear on the cover, does appear.
Let us help you find the answer to your Pictavo question!
Did you know that Pictavo has a very extensive Help Menu that can be accessed from any Pictavo page? Just click on the “Help” button in the upper right hand corner. This will open Pictavo’s help section in a new tab, so you can toggle back and forth between the help screen and your Pictavo book.
Exploring Pictavo’s Help Section
There are two ways to find out the answer to your Pictavo question:
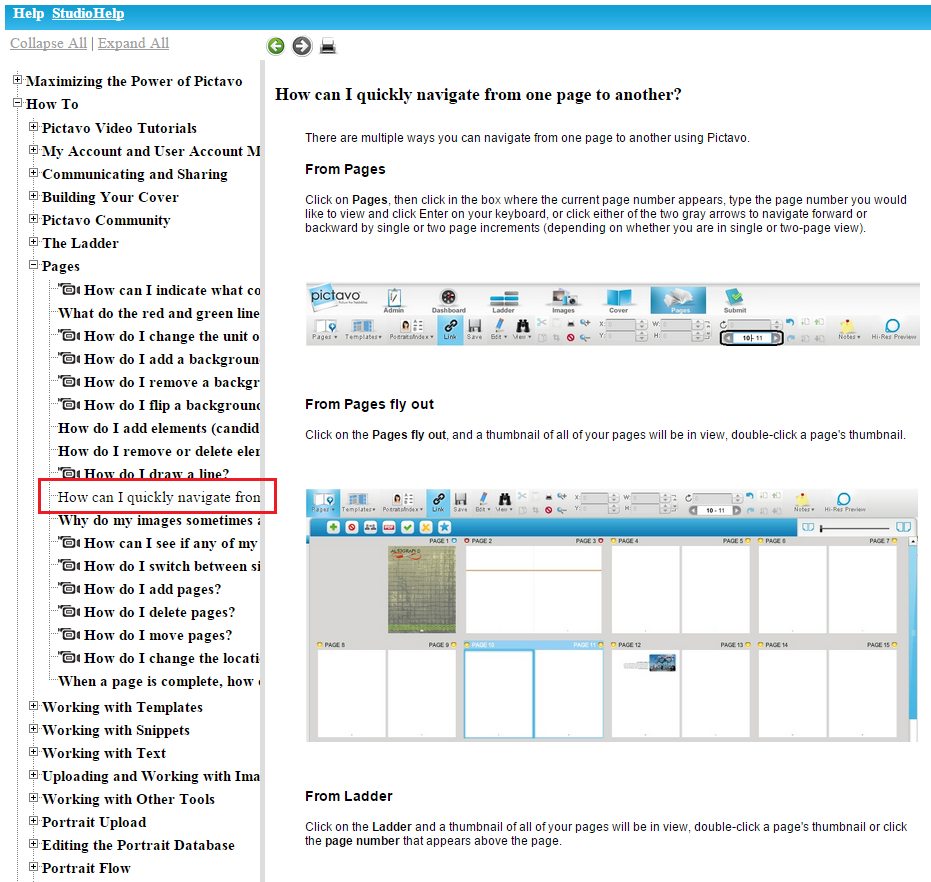
 1. You can search through all of the help topics by clicking on the “+” next to desired help category to expand the list. For example if you would like to know more about Pages you would click on the + next to How To and then the + next to Pages. From there you can select from a wide variety of articles.
2. In the Help Menu Search Field, type in the topic of your question and hit the “magnifying glass” search button. This may bring up several search results in which you may find the answer
So basically, if you want to learn how to move pages in your book, you can go to “How to > Pages” or you can search “move pages.” There you’ll find “How do I move pages in my book.” When you click on that, you’ll get step by step instructions on how to move the pages in your Pictavo book. Some help topics will also contain a video tutorial.
So go ahead and log in to Pictavo (pictavo.com) and check out the Help Menu! If you need further assistance, then please contact our Technical Support Team at 1-800-887-0414 or contact a Yearbook Life representative at 1-888-680-0143.
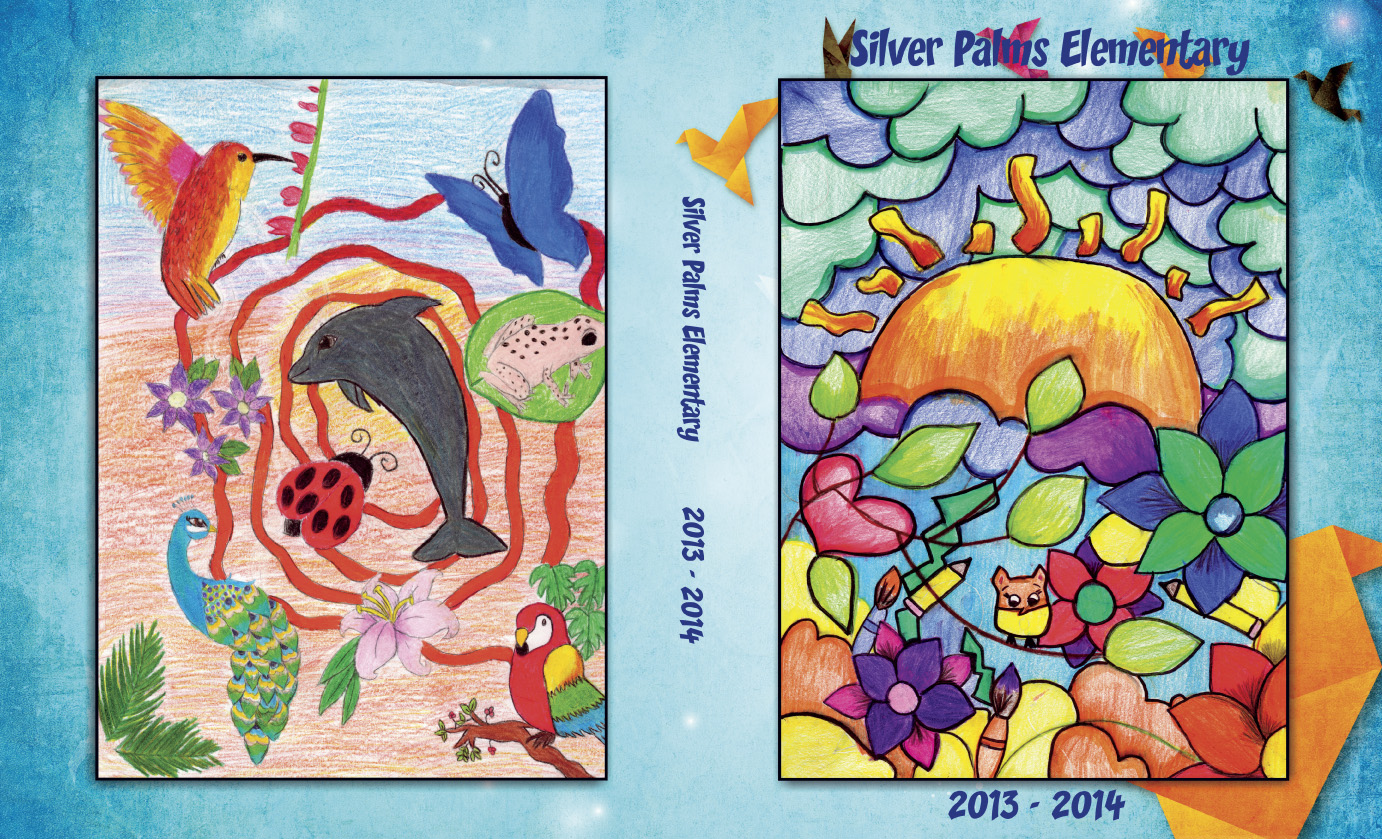 One of the more common cover art design options is to use student artwork. Many schools will suggest a theme for their cover and conduct a student art contest. The drawings are then judged and the winner, or winners, drawing is placed on the cover as the design.
But how do you get that drawing onto your Pictavo cover? Here are some pointers:
1. These drawings are, preferably, designed on a standard sheet of printer paper – 8 ½” x 11”. Please scan these drawings at 300 dpi. Refer to your scanner’s manual for instructions.
2. Save the drawings as .jpgs and upload them to Pictavo into a Candid Images folder.
3. You then have two design layout options:
1. Bleed the image to the edge: This means that the drawn image fills one entire cover side (front or back, depending on placement). To do this, you have to expand the image through to the outside edge of the yellow border, but be careful that there is no significant artwork past the green border “safe zone”. Anything past that green border runs the risk of being trimmed.
2. Frame the drawing (preferred): We recommend placing the entire image within the green border “safe zone” and adding a solid color background behind the image. This will give the artwork a “framed” look and enhances the cover with additional color. This is the preferred layout option because it enables you to keep the integrity of the full drawing without the risk of any it being trimmed.
Using this method also gives you the option of adding more than one drawing to either side of the cover. For example, many schools will use a contest winning drawing for the front cover, and runners up drawings for the back cover.
For instructions on how to add this color background, click here to watch an instructional video, or go to the Pictavo Help menu under “+How to / Building your Cover / How do I add a color background to my custom cover?”.
The students will be thrilled to see their drawings on the cover! Other ideas for “runners up” drawing or contest participants – how about scanning and uploading the drawings and using them as page/section dividers in your book… or create a collage page of all of the designs… or use them as clip art! This way, all of the artists are represented.
And don’t forget to give credit to the artists by labeling the cover drawings with text boxes that ready “Cover Design by” or “Artist”.
These student drawn covers can really set a personalized tone for your school’s book.